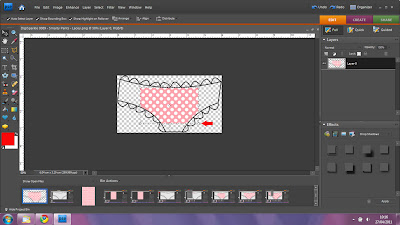
This is just to show a very basic digital paper piecing using Photoshop Elements 7. I'm assuming that you have only very basic knowledge so may tell you things you already know or you may know a better way of doing this. There are keyboard shortcuts for the tools I'll use but I haven't mentioned them here to keep things simple.
If you don't have Photoshop Elements there are various free digital image programs available to download, I used to use Paint.Net, and Gimp is another. They won't work in exactly the same way as PSE but the basics will be the same.
I've started by opening my image (preferably a PNG file with transparent background, but it works for JPG files and white backgrounds too). This image is from a Digisparkle set called Smartypants. Sadly the store is closing in May but Heather has a voucher here, which is very generous as the store is such good value.
I would recommend doing 'save as' at this stage so you don't overwrite your original file, click on File, then Save As, then call it anything you like! Now any changes you make won't affect the original copy of the image so its there to use another time.
Now open the background you want to use - mine is a from a polka dot pack from Funky Hand. This particular paper is A5 in size so is much bigger than we need. If we used it as it is we'd end up with only 1 or 2 very big spots on our pants...
Use the rectangular marquee tool to select a small area of the paper.
Just click on the paper with the mouse, then drag the cursor in a diagonal direction. Your selected area will be surrounded by a dashed line. Then click on Edit>Copy (or I use the keyboard shortcut Ctrl+C)
Now go back to your original image, where we want to select the area to be paper-pieced. This is really simple, click on the Magic Wand Tool, then click inside the area you want to paper-piece. Again your selection will be surrounded by dashed lines.
Now the exciting bit - it really was a 'wow' moment for me the first time I did it! To paste our paper into the selection click Edit>Paste into Selection, or (Ctrl, Shift + V if you prefer the keyboard shortcuts)
This is what I ended up with using my selection, my paper piece wasn't big enough to fill the area. But don't panic, no need to do it again (unless you want smaller dots - in that case undo this last action, go back to the paper and select a bigger area, copy and paste into selection again).
But for our purposes all we need to do is resize the rectangle we're pasting. Click on the Move Tool.
You'll see little squares at each corner of the rectangle, and in the middle of each side
To resize without distortion use the corner squares, just click on each one and drag diagonally until the paper covers the whole area you want. Often you will only have to use 2 opposite corners)
When you're happy with it, click the green arrow.
Then finally, I've just 'deselected' everything to get rid of the dashed lines around the image. Click Select>Deselect (or Ctrl+D)
And that's it - your completed image!
I hope you've found this useful and it all makes sense. I'll do a follow-up in the near future showing how I made a whole card like this.
Lesley x


Thank you so much for this tutorial! I look forward to seeing one on how you did a card!! My biggest problem will be lack of digi images that I could use. I've looked for images before but can't seem to find a good site to get them. Again, thank you so much!!
ReplyDeleteThank you for taking the time to do this brilliant tutorial, Lesley. Thank you, also, for your kind comments on my blog xx
ReplyDeleteGreat tutorial - also love all the CAS cards you have been making - there is a little something on my blog for you Here
ReplyDeleteThankyou so much for this great tutorial! I tried everything and to think it was that easy!
ReplyDeleteYou are wonderful!!
Huggs
Lynn xxx